Showing posts with label watercolor. Show all posts

Friday, October 30, 2015

Easy DIY Spider Web Trick or Treat Bags

Bright and colorful spider web trick or treat bags with black pom pom spiders dangling over their webs

This blog post is coming out sort of under the wire but I just had to share these quick and easy trick or treat bags that kids can make for Halloween night! I love the idea of hand made trick or treat bags! They can be personalized in so many different ways to match your child's costume or to just have fun with all the great Halloween imagery!

I came up with two designs for a spider web trick or treat bag. The first one is a really fun process art craft using bits of tissue paper and contact paper. This process is used a lot to make pretty suncatchers and "stained glass" art.

Trick or treat bag made with shades of purple and green tissue paper with cute black spider on a white web with large orange letters spelling trick or treat

The second design uses white crayon to create a watercolor resist spider web (here is a spider web craft using oil pastel: Oil Pastel Resist Spider Webs).

Spider web Trick or treat bag made using a white crayon as a watercolor resist with cute black spider with pink spots

To me, the spider is the finishing touch on the trick or treat bags. I love these dangling pom pom spiders because they give the bag some real bounce (and they are pretty darn cute, especially when dressed up a bit!)! If you are pressed for time or don't feel like pulling out the hot glue gun, you could also use spider stickers or cut out a paper spider and glue it to the bag.

Cute black pom pom spiders with googly eyes and felt embellishments to make crowns, spots and hearts. King queen princess prince spiders

All you need for this project are things you probably already have on hand... crayons, watercolors, tissue paper, contact paper, craft paint, and, of course, a paper bag. I used a plain white one but you can recycle, for example, an old birthday bag if you are making the contact paper bag.

White paper craft bag on light wood table


Watercolor Resist Trick or Treat Bag

You will only need two things for this bag: crayons and a set of watercolors.

White crayon, black and white paintbrush next to a colorful watercolor set

If your kids are very young, you can draw a spider web on the bag with a white crayon. Older kids can draw their own. I used white, but it would also be fun to use other crayon colors or several colors!  Just be mindful of the colors you choose... the beauty of the resist is in the contrast you get by keeping the paint off the areas with crayon (white is pretty much a fool proof color for this technique).

Paint, and paint, and paint until the bag is covered in beautiful watercolors! Layer the paints, splatter them, add some salt, go wild with any watercolor technique you like or can think of! Kids will love seeing the spider web "magically" appear on the bag with each brush stroke!

Drawing a white spider web onto a white craft bag with a white crayonPainting beautiful orange yellow and red watercolors onto a white craft bag revealing a white spider web

Allow the paint to dry and add a spider!

Cute black pom pom spider with pink felt spots on a beautiful orange red yellow and black watercolor background


Tissue and Contact Paper Trick or Treat Bag

This bag is a lot of fun for younger kids or kids you enjoy a more sensorial art process! They will get to rip up tissue paper, toss it onto the contact paper, and pat it all down with as much gusto as they like!

All you need is contact paper, tissue paper in a variety of colors, and some white acrylic craft paint. The paint is for the spider web, but if you don't want to use paint, another option is to cut out a paper spider web in the same way you would make a paper snowflake (Spider Web Kirigami).

Cut out a piece of contact paper slightly larger than the bag.

Colorful shades of tissue paper, contact paper and white acrylic craft paingCutting contact paper to fit a white craft bag

There are a few ways you can attach the contact paper to the bag at the end of the art making process. I opted to fold the contact paper over the edges of the bag to secure it to the bag. Therefore, I needed to cut the contact paper around the hand straps of the bag.

Cutting contact paper down to size around white craft bagWhite craft bag and contact paper

Remove the backing of the contact paper and place it over the bag with the sticky side up.

Paint a spider web on the sticky side of the contact paper (the contact paper was placed on top of the bag so I knew how big I needed to make the spider web). Allow the paint to dry.

White craft bag and contact paperPainting a white spider web on the sticky side of the contact paper

Tissue paper time! Have your kids rip up the tissue paper.

For younger kids, secure the contact paper to a table with a little tape. Sticky side still up, cover the contact paper with the bits of tissue paper.

Beautiful bits and pieces of torn up colorful  tissue paperSticking colorful pieces of torn up tissue paper to contact paper with a white spider web painted on it

Pat all the tissue paper down to make sure it is all sticking to the contact paper.

Secure the contact paper to the bag. As I mentioned before there are several ways to do this:

  • Use the excess contact paper around the border to fold it over onto the bag (this is what I did and could probably be done successfully with older children. You just have to leave some free space -- no tissue paper -- around the edges of the contact paper).
  • Cut the contact paper down to size and tape it onto the bag around the edges.
  • Cut the contact paper down to size and spread glue all over the tissue paper and glue it to the bag.
The 2nd and 3rd options are easier when doing this project with younger kids because they will cover every inch of the contact paper with tissue paper.

Colorful pieces of torn up tissue paper stuck to contact paperTrick or treat bag made with shades of purple and green tissue paper with a white painted spider web

Add the spider and maybe some letter stickers!

Attaching a cute black pom pom spider with googly eyes to a trick or treat bag

Trick or treat bag made with shades of purple and green tissue paper with cute black spider on a white web with large orange letters spelling trick or treat


Pom Pom Spiders

For the pom pom spiders you will need one pipe cleaner (chenille stem), one large pom pom (spider's body), one small pom pom (spider's head), googly eyes, and a piece of yarn or string. You can also use bits and pieces of left over felt to make any additional embellishments to fancy up the spider.

Black pom poms, black pipe cleaner chenille stem, googly eyes

Cut the pipe cleaner into 8 pieces of equal length. These are the spider's legs.

Taking the big pom pom, open up it up and apply hot glue to that area. Push 4 of the legs into the hot glue and close up the pom pom, giving it a gently squeeze. Repeat on the opposite side.

Black pom poms, black pipe cleaner chenille stem, googly eyesattaching pipe cleaner chenille stem legs to black pom pom

The spider's body is ready!

Apply some hot glue to the small pom pom and attach it to the body.
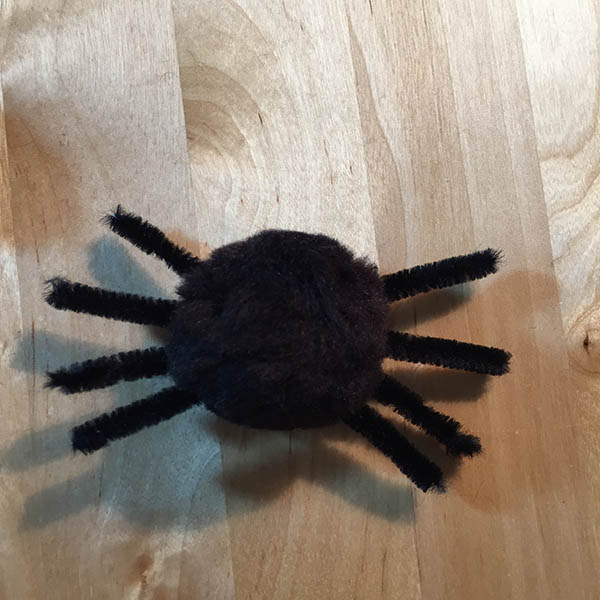
black pom pom spider body with legscute black pom pom spider

Glue on the googly eyes.

If you like, add some felt embellishments.

cute black pom pom spider with googly eyesCute black pom pom spider with pink felt spots and googly eyes

Open up the pom pom at the spider's bottom. Apply a dot of hot glue to it and glue the yarn or piece of string in place. Close up the pom pom and give it a gently squeeze.

Attaching black yarn to cute black pom pom spider with pink felt spots

The spider is ready for its web!

Cute black pom pom spiders with googly eyes and felt embellishments to make crowns, spots and hearts. King queen princess prince spiders

Cute black pom pom spiders with googly eyes and felt embellishments to make crowns, spots and hearts. King queen princess prince spiders

Have a very happy and safe Halloween!!!

Thursday, October 8, 2015

DIY Wall Display for Children's Artwork

DIY Wall Display for Children's Artwork

I love to display our daughter's artwork, to me it teaches her that her creativity and expression is a gift and should be valued. But, I'll admit, I have struggled with the best way to display her artwork and crafts. 

There are lots of very cool ideas around the web but what initially worked great for me was a gallery wall of Ikea Nyttja frames in a variety of sizes and colors. I would just tape the artwork to the front of the frame, right on top of the glazing (acrylic), because I know myself... I would never ever have the patience to constantly be opening up the frame to change out the artwork! This was a great solution because it also allowed me to tape up thicker pieces of artwork, like paper plate crafts, things painted with 3-dimensional paint, paper crafts with flaps, etc.

Colorful gallery wall with walrus and chick crafts.

I still love the gallery wall but I grew tired of all the taping and really wanted something that was easier to quickly change things out or move things around. I still wanted something that could accommodate artworks of various sizes and thicknesses as well as hanging craft necklaces and little paper ornaments.

What I came up with was a vertical hanging display made out of tree branches and jute cord! The artwork is attached to the jute cords using colorful mini-clothespins. I made sure to select a branch with a bifurcation so I could easily hang crafts with cords. I love the rustic feel of it! It is 75 inches (190.5 cm) tall and 26 inches (66 cm) wide. The spacing between the jute cords is 2.75 inches (7 cm) and there are 9 cords total. 

Colorful young child's artwork hanging on wall displayChildren's artwork hanging on the wall.

Pink dog picture

Purple clothespin holding up child's artwork.

This is probably one of the cheapest DIYs I've done because I found the tree branches and only had to purchase the jute cord because I had the other materials on hand. Here's what you'll need:

  • Tree branches
  • Jute cord
  • Sandpaper
  • Acrylic paint (optional)
  • Polycrylic protective finish (optional)

Process:
I just wanted to mention safety before getting into the process. I used a saw, a utility knife, a power sander, and a drill to get the tree branches the way I wanted them. Please, always use personal protective equipment when necessary. Safety glasses or goggles, face masks, half-face respirator masks, gloves... be safe when using power tools, it's very easy for something to go flying and hit you in the eye. Here I am ready to use my power sander (I love this picture!! I put on my gloves after I took the picture.):
Holding a Makita sander

1 - Find some fallen tree branches in a public area.

2 - Define how wide you would like the wall display to be. In my case, I opted for 26 inches and marked it on my tree branches.

Three tree branches leaning up against a gray cinder block wall.Measuring tape laid out next to a tree branch.

3 - Saw the tree branches down to size.

4 - Remove the bark (optional).

Red saw cutting through a tree branch.Removing tree bark with a yellow utility knife.

5 - Sand the tree branches.

6 - Mark the drill points where the jute cord will run through the branch. I had 9 cords in total, spaced 2.75 inches apart. (Another option is to just tie the jute cord around the branches instead of drilling holes, but I believe this is a sturdier solution... there is no chance of the cords slipping around this way.)

Power sander laying next to a bare tree branch.Marking black dots on a piece of wood.

7 - Drill, drill, drill!

8 - The branches are now ready to paint! Painting is optional, I almost left them bare, but ultimately thought the display would look better in white.

Drilling holes in a bare tree branchThree tree branches laying next to a plate with white acrylic paint and a foam brush.

9 - I used white acrylic paint and watered it down a bit. I wanted to retain some of the characteristics of the wood, so I figured a white wash would be most appropriate.

10 - Paint!

Spritzing water on acrylic paint.Painting tree branches white with a foam brush

11 - Allow them to dry.

12 - Apply a sealer. I used Miniwax Water-Based Protective Finish.

Painted white tree branchesPolycrilic sitting next to brancc.

13 - Now it's time for the jute cord.

14 - I made a Bowline knot to create a loop for hanging the display to the wall. In total, I had two loops, one at each end of the display (at the ends of cords 1 and 9).

Jute cordTying a bowline knot

15 - Pass the jute cord through the drill hole in the branch and secure it with a Figure 8 knot.

16 - The top of cord 1. Tip: The end of the jute cord can fray and make it difficult to run it through the drill holes. Cover the end with some white glue and allow it to dry. It will be stiff enough to run through the holes without a needle and will not fray.

Tying a Figure 8 knotCompleted knots

17 - Space the branches evenly and run the cord through the drill holes. Secure the cord with a Figure 8 knot after exiting each drill hole.

18 - Repeat for cord 9. Cords 2 - 8 do not require a Bowline knot, only Figure 8 knots.


Tree branches spread out evenly on the living room floor.Detail of the knots.

And here it is ready to be hung up on the wall! It took roughly half a day to complete. The longest part was definitely getting all of the cords attached to it... The branch prep and painting only took about 2 hours to do.

Finished DIY waiting to be hung up on the wall.

While I was running the cords through the branches, I decided to dye some mini-clothespins! I used liquid watercolors made from dried out markers (I think these watercolors are absolutely brilliant and just about the easiest project ever. And as an added bonus you have a use for the piles and piles of old markers kids go through!).

I just dunked the clothespins in the liquid watercolors and let them dry. I repeated the process two more times.

Miniclothes pins and pink and purple liquid watercolors.Colorful clothespins drying.

The colors turned out beautifully!

Rainbow colored clothespins

I love how versatile this wall display is and I know it's going to get a lot of use! I still plan on using the frames, but probably for special pieces (like the Pressed Flower Children's Art) and this time around I will probably put them inside the frames!