Thursday, October 8, 2015

DIY Wall Display for Children's Artwork

DIY Wall Display for Children's Artwork

I love to display our daughter's artwork, to me it teaches her that her creativity and expression is a gift and should be valued. But, I'll admit, I have struggled with the best way to display her artwork and crafts. 

There are lots of very cool ideas around the web but what initially worked great for me was a gallery wall of Ikea Nyttja frames in a variety of sizes and colors. I would just tape the artwork to the front of the frame, right on top of the glazing (acrylic), because I know myself... I would never ever have the patience to constantly be opening up the frame to change out the artwork! This was a great solution because it also allowed me to tape up thicker pieces of artwork, like paper plate crafts, things painted with 3-dimensional paint, paper crafts with flaps, etc.

Colorful gallery wall with walrus and chick crafts.

I still love the gallery wall but I grew tired of all the taping and really wanted something that was easier to quickly change things out or move things around. I still wanted something that could accommodate artworks of various sizes and thicknesses as well as hanging craft necklaces and little paper ornaments.

What I came up with was a vertical hanging display made out of tree branches and jute cord! The artwork is attached to the jute cords using colorful mini-clothespins. I made sure to select a branch with a bifurcation so I could easily hang crafts with cords. I love the rustic feel of it! It is 75 inches (190.5 cm) tall and 26 inches (66 cm) wide. The spacing between the jute cords is 2.75 inches (7 cm) and there are 9 cords total. 

Colorful young child's artwork hanging on wall displayChildren's artwork hanging on the wall.

Pink dog picture

Purple clothespin holding up child's artwork.

This is probably one of the cheapest DIYs I've done because I found the tree branches and only had to purchase the jute cord because I had the other materials on hand. Here's what you'll need:

  • Tree branches
  • Jute cord
  • Sandpaper
  • Acrylic paint (optional)
  • Polycrylic protective finish (optional)

Process:
I just wanted to mention safety before getting into the process. I used a saw, a utility knife, a power sander, and a drill to get the tree branches the way I wanted them. Please, always use personal protective equipment when necessary. Safety glasses or goggles, face masks, half-face respirator masks, gloves... be safe when using power tools, it's very easy for something to go flying and hit you in the eye. Here I am ready to use my power sander (I love this picture!! I put on my gloves after I took the picture.):
Holding a Makita sander

1 - Find some fallen tree branches in a public area.

2 - Define how wide you would like the wall display to be. In my case, I opted for 26 inches and marked it on my tree branches.

Three tree branches leaning up against a gray cinder block wall.Measuring tape laid out next to a tree branch.

3 - Saw the tree branches down to size.

4 - Remove the bark (optional).

Red saw cutting through a tree branch.Removing tree bark with a yellow utility knife.

5 - Sand the tree branches.

6 - Mark the drill points where the jute cord will run through the branch. I had 9 cords in total, spaced 2.75 inches apart. (Another option is to just tie the jute cord around the branches instead of drilling holes, but I believe this is a sturdier solution... there is no chance of the cords slipping around this way.)

Power sander laying next to a bare tree branch.Marking black dots on a piece of wood.

7 - Drill, drill, drill!

8 - The branches are now ready to paint! Painting is optional, I almost left them bare, but ultimately thought the display would look better in white.

Drilling holes in a bare tree branchThree tree branches laying next to a plate with white acrylic paint and a foam brush.

9 - I used white acrylic paint and watered it down a bit. I wanted to retain some of the characteristics of the wood, so I figured a white wash would be most appropriate.

10 - Paint!

Spritzing water on acrylic paint.Painting tree branches white with a foam brush

11 - Allow them to dry.

12 - Apply a sealer. I used Miniwax Water-Based Protective Finish.

Painted white tree branchesPolycrilic sitting next to brancc.

13 - Now it's time for the jute cord.

14 - I made a Bowline knot to create a loop for hanging the display to the wall. In total, I had two loops, one at each end of the display (at the ends of cords 1 and 9).

Jute cordTying a bowline knot

15 - Pass the jute cord through the drill hole in the branch and secure it with a Figure 8 knot.

16 - The top of cord 1. Tip: The end of the jute cord can fray and make it difficult to run it through the drill holes. Cover the end with some white glue and allow it to dry. It will be stiff enough to run through the holes without a needle and will not fray.

Tying a Figure 8 knotCompleted knots

17 - Space the branches evenly and run the cord through the drill holes. Secure the cord with a Figure 8 knot after exiting each drill hole.

18 - Repeat for cord 9. Cords 2 - 8 do not require a Bowline knot, only Figure 8 knots.


Tree branches spread out evenly on the living room floor.Detail of the knots.

And here it is ready to be hung up on the wall! It took roughly half a day to complete. The longest part was definitely getting all of the cords attached to it... The branch prep and painting only took about 2 hours to do.

Finished DIY waiting to be hung up on the wall.

While I was running the cords through the branches, I decided to dye some mini-clothespins! I used liquid watercolors made from dried out markers (I think these watercolors are absolutely brilliant and just about the easiest project ever. And as an added bonus you have a use for the piles and piles of old markers kids go through!).

I just dunked the clothespins in the liquid watercolors and let them dry. I repeated the process two more times.

Miniclothes pins and pink and purple liquid watercolors.Colorful clothespins drying.

The colors turned out beautifully!

Rainbow colored clothespins

I love how versatile this wall display is and I know it's going to get a lot of use! I still plan on using the frames, but probably for special pieces (like the Pressed Flower Children's Art) and this time around I will probably put them inside the frames!

Thursday, October 1, 2015

Constellations Telescope: Learning about the Stars

Telescope for Kids with Constellation Card and activities for Learning about the Stars

I love mythology! One of my most vivid memories as a child is visiting a 2nd hand book shop and purchasing Edith Hamilton's classic Mythology: Timeless Tales of Gods and Heroes for 10 cents. I devoured it and continued to read it consistently over the years. It is one of the books that I made sure was in my suitcase on every one of our many many moves. 

A few months ago our daughter showed a sudden interest in space, planets, rockets, and stars and we all got into it really quickly! We have been on a bit of an astronomy binge ever since! And it definitely has been an exciting year to follow space news, with the New Horizons' Pluto flyby, the recent Perseid meteor shower, the "supermoon" eclipse this past weekend, and the discovery of water on Mars.

I've been loving reading about the constellations and planets and remembering the myths behind the names. On the opposite end of the spectrum, my husband has been having loads of fun locating the constellations and planets in the sky. I've always said we complement each other in our tastes extremely well!

I wanted to make a play telescope for our daughter to "observe" the individual constellations as well as project them onto the wall (our daughter loves any activity that involves a flashlight!). Looking around on Pinterest I found a Paper Tube Telescope Craft at Kids Activities Blog and an Oatmeal Container Planetarium from the Relentlessly Fun Deceptively Educational blog. The combination of both would be exactly what I wanted, so I excitedly started planning and designing!

What I came up with was a telescope with a card holder at one end to change out constellation cards. Each star of a constellation is a hole in the card so light can pass through. The first time my daughter looked through the toy telescope, her reaction was, "This is amazing!!!" (that made my day!) and she has been requesting it at bedtime every night to "play with the stars" before her bedtime story. 

Toy telescope with star constellation cards on a dreamy space inspired blue and purple background.

The constellations can be viewed by looking through the telescope:

Looking through a homemade toy telescope with star constellations paints on itHand holding a small blue toy telescope which is showing the Cygnus constellation.

Or by projecting them onto the wall of a dark room by shining a flashlight through the open end of the telescope (these pictures were taken using my Iphone as a flashlight!):

Graph with star constellations of Scorpius, Crux, Orion , Taurus, Pisces, Big Dipper, Cygnus and Sagitta

The materials you will need to make this telescope are:
  • A sturdy cardboard tube (I used a tube I had left over from my Tulle Tutu Tutorial)
  • A cereal box
  • White glue and hot glue
  • Black card stock
  • Push pin
  • Acrylic paint and stickers for decorating 
The most involved part of the telescope is making the card holder. My tendency is to be very meticulous and methodical, so I always take a lot of process pictures to document every single step. This can sometimes make a craft seem harder than it actually is! Believe me, it's just me feeding my little monster who begs me for more details! I say this because when I started writing this post I was astounded by how many pictures I had! The whole thing didn't take more than 2 hours to do... 

So, now that I have you all excited for the process pictures, here we go!

1 - Open the cereal box and flatten it.

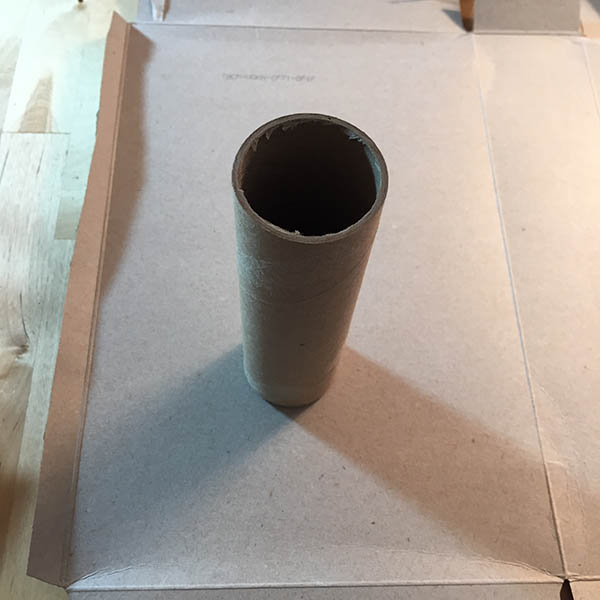
2 - Place the cardboard tube on the cereal box.


Tickled by the Creative Bug - Process Picture 1Tickled by the Creative Bug - Process Picture 2

3 - Outline the tube onto the cereal box. The tube I used is 2 mm thick. If you are using a thick tube like mine, outline the inner perimeter of the tube as well. The thickness of the tube makes a difference when connecting the card holder to the tube.

4 - Draw a series of triangles around the inner perimeter (the area colored black will be cut out in a later step). These triangles will be used to glue the card holder to the tube.

Decide how large you want the card holder to be and outline its area with the circles somewhat centered in the middle of the card holder.

Tickled by the Creative Bug - Process Picture 3Tickled by the Creative Bug - Process Picture 4

5 - Extend the sides of the card holder outline farther up to at least twice its original height.

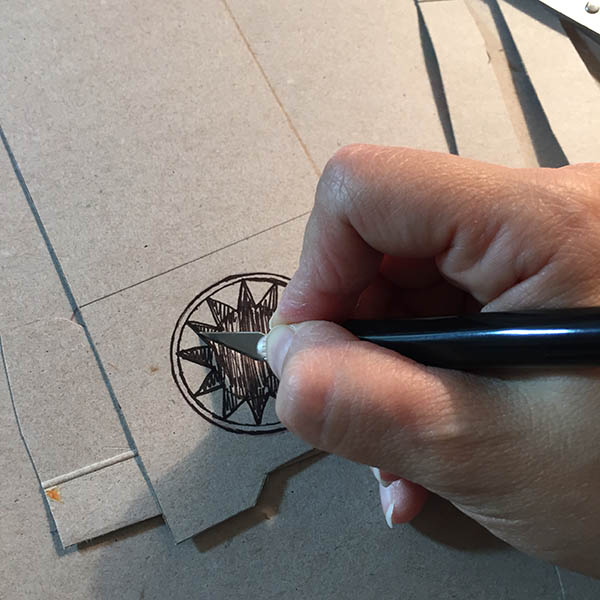
6 - Cut out the card holder. Then, using an X-acto knife, cut out the black area.

Tickled by the Creative Bug - Process Picture 5Tickled by the Creative Bug - Process Picture 6

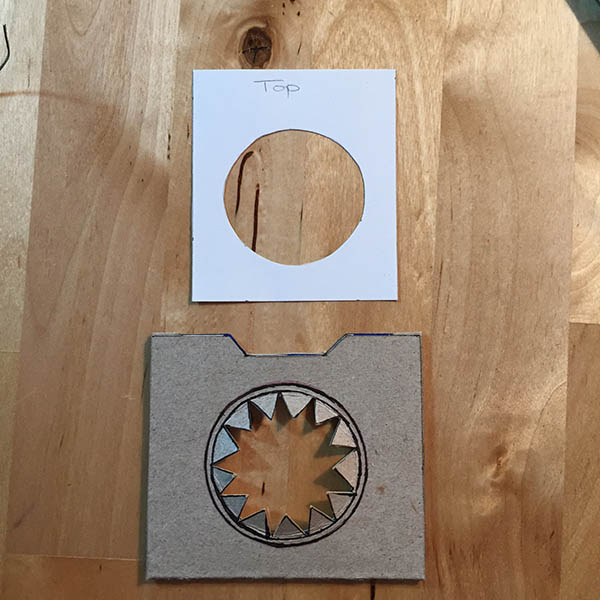
7 - This is what the card holder should look like after Step 6.

8 - Fold the card holder over itself.

Tickled by the Creative Bug - Process Picture 7Tickled by the Creative Bug - Process Picture 8

9 - We will now trim the card holder down to size. Start by tracing the top of the card holder.

10 - Cut off the excess cardboard.

Tickled by the Creative Bug - Process Picture 9Tickled by the Creative Bug - Process Picture 10

11 - The constellation cards will need a little bit of room to easily slide into and out of the card holder. To provide this room, we will create space by using two strips of cardboard cut from the cereal box. The strips (spacers) should be roughly the same height as the card holder but not too wide. There should be plenty of space between the spacers and the circles at the center of the card holder. Set the spacers aside.

12 - Gently fold the triangles upwards, away from the card holder.

Tickled by the Creative Bug - Process Picture 11Tickled by the Creative Bug - Process Picture 12

13 - Trace the perimeter of the inner circle onto the back of the card holder.

14 - This circle will be cut out.

Tickled by the Creative Bug - Process Picture 13Tickled by the Creative Bug - Process Picture 14

15 - Cut out the black circle.

16 - Glue the spacers to the inside of the card holder.

Tickled by the Creative Bug - Process Picture 15Tickled by the Creative Bug - Process Picture 16

17 - Glue the top of the card holder onto the spacers. The card holder is ready!

18 - Before connecting the card holder to the tube, I made a quick template for the constellation cards by tracing the card holder onto a piece of paper and reducing its width to account for the spacers. 

Tickled by the Creative Bug - Process Picture 17Tickled by the Creative Bug - Process Picture 18

19 - Just checking to make sure the template fits!

20 - Now let's glue it! Spread some white glue onto the triangles.

Tickled by the Creative Bug - Process Picture 19Tickled by the Creative Bug - Process Picture 20

21 - Glue the triangles to the inside of the cardboard tube.

22 - For added strength, I flipped the tube over and ran my hot glue gun around the base of the tube where the card holder connects to it. The card holder was very firmly connected to the tube after these two gluing steps. At this point, the telescope is essentially done!

Tickled by the Creative Bug - Process Picture 21Tickled by the Creative Bug - Process Picture 22

23 - Now onto the constellation cards! Trace the card template onto the black card stock. 

24 - Trace it as many times as the number of constellations you want. Cut them out. Important: Only cut out the rectangle, do not cut out the circle.

Tickled by the Creative Bug - Process Picture 23Tickled by the Creative Bug - Process Picture 24

25 - Draw the constellation INSIDE the circle on the card stock.

26 - Mark each star of the constellation with a little circle and write the name of the constellation at the top of the card with a white gel pen.

Tickled by the Creative Bug - Process Picture 25Tickled by the Creative Bug - Process Picture 26

27 - Using a push pin, push it through the card stock only at the star locations.

28 - The Big Dipper!

Tickled by the Creative Bug - Process Picture 27Tickled by the Creative Bug - Process Picture 28

29 - Erase the circle and connect the dots with a white gel pen.

30 - Testing and success!

Tickled by the Creative Bug - Process Picture 29Tickled by the Creative Bug - Process Picture 30

31 - Now comes the fun part, decorating it! I recruited my daughter to paint her telescope. It started out pink, then it was purple, and finally she settled on a dark blue. It had a lot of paint on it!

32 - We added some silver star stickers and later I painted on some constellations. I sealed everything with a layer of Mod Podge. All done!

Tickled by the Creative Bug - Process Picture 31Tickled by the Creative Bug - Process Picture 32

One last thing... Using the flashlight on my Iphone resulted in a really crisp projection of the constellations onto the wall (as I showed up at the beginning of this post). However, when I tried a small handheld flashlight I got a lot of halos around the stars:

Light circles  projected onto the dark wall. Star constellations shine brightly

This is due to the light bouncing all around from the flashlight's reflective interior. To fix this I punched a small hole through the center of a small piece of cardboard or card stock. I then taped this piece of card stock to the flashlight. Problem solved, now the projections looked just like the ones using the Iphone.

Hand holding small black flashlight4Cardboard taped to top of hole.

If you'd like to dedicate a flashlight solely for this project, another option is to paint the reflective surface on the inside of the flashlight black. Instructions at Handmade Charlotte.

Some great books for kids and big kids:

Additional activities from around the web:
  • While the weather's still nice up here in the Northern Hemishpere, kids can make constellations using rocks and sidewalk chalk. Instructions at Creekside Learning
  • A nice quiet hands-on activity using mini-marshmallows and toothpicks to make the constellations. Instructions at Edventures with Kids
  • Construct the constellations with star stickers and chalk on black construction paper. The mom even let the kids turn her into a constellation with some left over gold star stickers. Love her! Instructions at Gift of Curiosity